I have been busy over the last month with other things than sewing.
I had to make progress on sorting out some lighting and power points to complete a room rewire I have been doing for just ages! In the process I also decided to sort out a horizontal surface crack on a wall that just stood out when the lights were on – it had been that way for years!
Anyway I hacked the wall out along the crack, used PVA and filler to fill it to below surface level, then used Wickes ready mixed skim plaster to do the final finishing. It is wonderful stuff and so much easier to use that filler. The skim plaster sands very easily by hand and you get a perfect finish. Seal it with diluted PVA and then paint over and you don’t see it at all. I have been using it for at least 20 years during my DIY jobs! It’s great for filling in holes when you remove a screw if you don’t need that particular point in the wall to be extra strong.
The electric points were a pain – I was replacing the original fittings I put in 18 years ago with flush mounted ones – this meant digging out the shallow back boxes, and hacking out a bit of the wall around to be able to move the cables out of the boxes and get the boxes out. Then more hacking of the wall to make the hole deeper before putting the new boxes in.
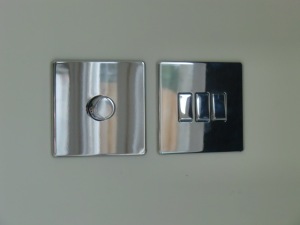
It wasn’t make easier by the fact I was fitting two boxes side by side for the light switches – 1 with a dimmer, and the other with a 3 gang switch – and they needed to be level. There is some adjustment on the back boxes and some on the fittings but it’s still tricky.
The 3 gang was a nightmare to wire up with all the wires because of the limited space – there were actually 4 cables as one of the switches is an inline switch meaning it needed a power cable to come in to the box and a lighting cable going out of it, which itself means you need to connect their live wires to the switch and their neutral wires to a connector, so that had to fit in as well – plus an additional earth wire from the fitting, because it is metal, to the back box. Oh and I forgot one of the other cables is a 2 way switch cable so has an additional wire in it to connect! You can see the nightmare!
Anyway I eventually succeeded and here is the finished result!
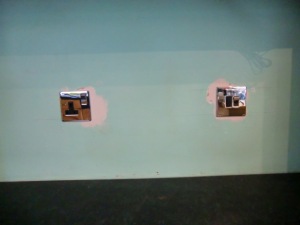
 I also had to make sure the 2 power points were level, but as they are several inches apart it is not so critical to be absolutely spot on.
The 13amp connector on the right was another nightmare. It has 3 cables – two for the ring circuit and one for the load, plus the earth for the accessory. It was fiddly and took me 3 attempts to get it all wired and the fitting actually screwed back in to the wall.
I will be tiling behind them at some point this winter so I didn’t have to paint the wall – just seal the skim plaster with the PVA.
 When I do the tiling the fittings will be further out from the wall which means I need longer screws. I had lots of long screws for the normal fittings where you can see the screws, but none for the screwless plates where the screws fit under the plates. The heads need to be flat for the covers to fit. Normal screws have a rounded head.
I searched and searched when I bought the fittings last year but just couldn’t find any longer screws anywhere – eventually I contacted the manufacturer to ask where I could buy them. They asked how many I wanted – I said 20 – they sent me 30 free of charge – I call that a result. I still don’t know where I can buy them from though! But then again I don’t envisage ever needing any more.

Crikey – not only can you sew and do up old sewing machines but you can do electrics too! I don’t mind having a go at most things but electrics is something else!
Did you just teach yourself or have you received training? I’m impressed!!!
LikeLike
All self taught – but I do read all the relevant regulations (have my own copy) and I do it all to meet them. I first bought The Which Book of Wiring and Lighting over 20 years ago and rewired our bungalow over several months when we first moved in 18 years ago – so I know exactly where all the cables are. The regulations in UK changed in 2005, but before that you were allowed to do anything yourself. Now you should follow Part P of the Building Regulations. It’s ok to replace fittings (as long as it’s not in a kitchen or bathroom unless you get it checked) but your not allowed to put in a whole circuit without notifying building control and paying a fee for inspection and testing – though you can repace wiring on part of the circuit if it needs it – which I guess is a bit of a get out clause.
Outside wiring is also supposed to be notified to building control unless you are just putting a socket on the house wall.
They say it was because of all the unsafe systems that people had because someone had messed up and the deaths and fires they caused. I don’t know about that – maybe they were just trying to safe guard the jobs of electricians.
I won’t touch anything unless I know what I am doing and confident I am doing it correctly.
My father was a builder and I grew up knowing all about DIY!
LikeLike
Well……wow!!
LikeLike
you could bond new plaster with diluted emulsion but not vinyl emulsion then its absorbed into the plaster so you don’t get pealing paint later on. you don’t need to seal the plaster but form a bond with it.
LikeLike
You are right Robert. I should have said bond it all together. I actually used PVA before the filler too to bond the plaster/wall surface all along the crack before using the filler. I use a coat of diluted emulsion on newly plastered walls, but I find the diluted PVA works better with the Wicks Skim Plaster when I am patching stuff up. (I don’t actually do full plastering – that’s an art!)
Using diluted emulsion on the Wicks stuff seems to pull it off the wall onto the roller, not keep the carefully sanded surface I have prepared. (I go over it all with my finger tips to find any uneveness that can’t actually be seen til you paint it.) I dilute the PVA 5 parts water to 1 PVA and apply gently with a large paint box brush. It works every time. Then a coat of diluted emulsion over the bit I’ve repaired.
Then I paint with a mini emulsion roller – for several reasons:-
1 – It gives a much better finish
2 – you don’t get splashes everywhere like you do with the big ones
3 – It’s lighter to use and my hands don’t get as tired – especially on ceilings
4 – it fits my hand better – only have small child size hands!
5 – The rollers are really easy and quick to clean compared to those big ones.
LikeLike